In this article, we’ll cover the features and benefits of a protective coating Raptor, preparation for application, the application, and the drying process.
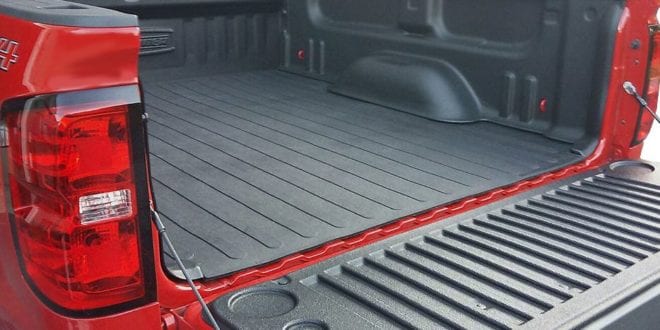
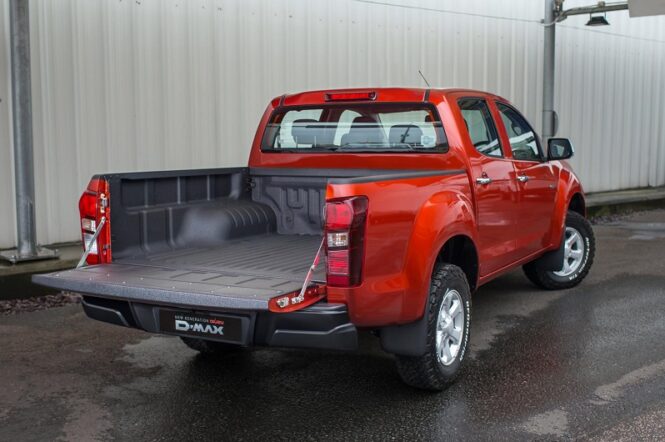
Raptor is a trademark of U-POL. The full name of this product is U-POL’s RAPTOR Truck Bed Liner, which means covering the rear platform of pickups and trucks. Initially, this coating was developed for this purpose. Later, Raptor paint began to be used everywhere, for painting both individual parts of the body and the entire body.
To get more information about the 5 best DIY spray in bedliners on the market, read this blog post from carinmydna.com.
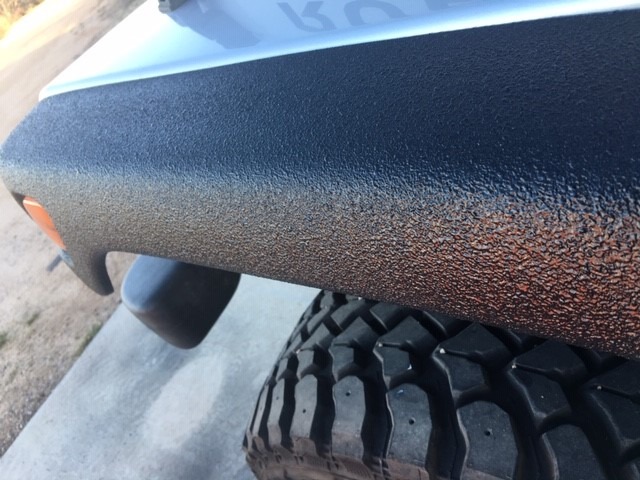
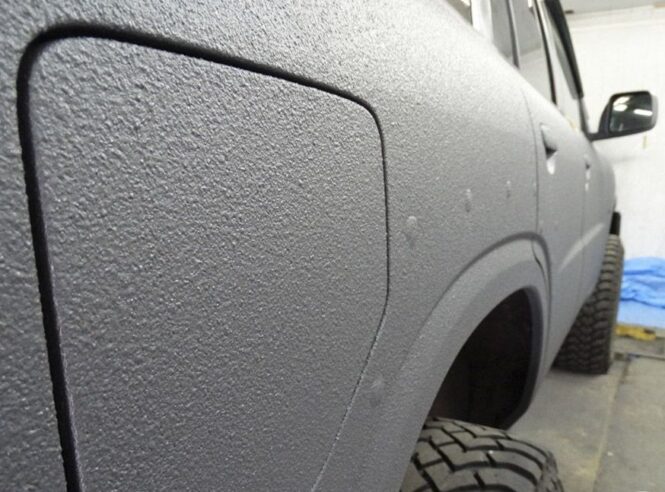
The coating can be applied to the areas most prone to wear. This coating is a 2-component paint, which means that it is mixed with the hardener before application. It has a urethane base, which gives this paint an exceptional strength, while it remains elastic and does not crack when struck. Spray or roll on RAPTOR as a truck bedliner or use to protect industrial surfaces, marine, off-road vehicles, and much more.
So, let’s list the main advantages of Raptor coating:
- Gives an aesthetic appearance and can be applied with different textures.
- Protects against moisture, salt, and corrosion.
- Resists the effects of fuel and oils.
- It provides protection from UV sun rays and does not fade over time.
- It is easy to apply, does not require high professionalism, does not require painting camera.
- Well resists the appearance of scratches (even from branches), resists abrasion.
- It resists the appearance of chips (provided that the surface is properly prepared before application).
- It helps to absorb noise and vibration and can be used as a protection for the bottom and arches.
- When used as a coating for the bedliner (cargo compartment) of pickups and trucks, it can be applied with texture (and additive) that prevents sliding. Provides a coating that can withstand harsh impacts.
- It can be applied to places that are most susceptible to wear.
But the Raptor has its disadvantages:
- It can not be varnished; hence the car body will be matte.
- The structure of the material on the body resembles shagreen, which slightly spoils the appearance of the vehicle.
- If you do not strictly follow the technology, it is possible to chip the coating in problem areas.
- A long period of complete drying of the material.
In what form is the Raptor kit sold?
This material is supplied as a ready-made set, which includes 4 containers of 750 grams with the paint itself and 1 liter with the hardener with which it is mixed. The package also includes a special gun (spray gun) for painting, which is already configured to work with this material.
All supplied containers are fitted for connecting the sprayer. You can buy options with black or cloudy white on the market. The latter, in turn, can be tinted with the help of pigment, achieving the desired shades.
In the package, you will also have instructions that specify the proportions for mixing the material and adding the pigment, as well as the basic safety rules when working with Raptor paint.
How to properly prepare the surface for painting
It is a crucial step to prepare the surface for Raptor coating. All the properties of this coating will appear in full only with careful preparation.
First, you need to clean the surface, remove all peeling coating and rust using special attachments for a drill or grinder. It can be applied directly to the paint prepared by sanding. The old paint should be sanded, and there should be no glossy spots before applying the protective coating.
“Bared” metal needs to be primed. Sand the surface with 120 – 220 grit sandpaper, in some cases 80 grit. This is a larger abrasive than is used in preparing the car for painting, but the Raptor has a thicker consistency than regular paint and holds well on a surface that has been sanded with larger sandpaper and fills in scratches from it well. There should be no areas left with gloss. The entire surface must be matt.
For hard-to-reach areas where it is impossible to sand the surface efficiently, U-Pol offers to spray the GRIP#4 adhesion promoter. It can also be used on “bare” plastic to improve adhesion. It can be sprayed directly on the glossy paintwork, which can then be painted without sanding.
Clean the surface from sanding particles and degrease. Raptor can not be applied to “bare” metal. Places with “bare” metal should be primed. U-Pol offers to use acid#8 etching primer or epoxy primer for this purpose. When applying an epoxy primer, it must be dried and prepared by sanding. It is not recommended to use a single-component acrylic primer from a can.
Raptor can only fill in minor surface imperfections. More serious damage must first be repaired, plastered, and primed. You need to seal all places that are not subject to painting with paint tape and covering material.
It is better to remove the masking tape after 15-20 minutes after applying the coating so that the border is smooth.
Mixing Raptor components
Raptor is sold in two versions – traditional Black and Tintable, to which you can add car paint (or pigment) of the desired color. It comes in 1 liter, 2 liter, and 4-liter spray kits, and there is also a roll-on kit.
Mix the Raptor according to the instructions. Raptor bottles are filled with 750 ml. You need to add 250 ml of hardener or mix 3 parts of Raptor and one part of hardener in a separate container. Then you need to stir everything for 2 minutes. If Raptor Tintable is used, up to 10% of the total amount of paint (or pigment) is added.
DIY painting technology
The coating should not be applied at too high or too low temperatures. The best temperature for spraying is 20 degrees Celsius, with less than 60% humidity.
When applying Raptor, you need to use a respirator, and it is better to work outside. Raptor hardener contains isocyanates, which are very toxic and harmful to health.
Raptor can be applied with a special gun (Schutz Gun), HVLP-spray gun, roller, or brush. There is also a more expensive spray gun with nozzle adjustment (Raptor Professional Vari-Nozzle Application Gun), which makes it easier to manipulate the spray, creating a different texture. We’ve gathered HVLP spray guns deals from around the Web on https://billious.com/best-
After stirring, the bottle is screwed to the gun, which, in turn, must be connected to the compressor. You need to adjust the pressure to 2,5-5 atm, depending on the desired texture. Lower pressure will give a larger texture, and higher pressure will give a finer texture. The distance and speed of movement of the gun will also affect the texture. Adding a thinner (up to 10%) will give a smoother finish. For this purpose, it is better to use a special thinner, but a universal acrylic thinner is also suitable. It is not recommended to use solvents, as they will weaken the properties of the coating.
Experiment with the pressure settings and do a test spray on the cardboard to find a texture that you like. The recommended distance is 15-17 in (up to 60 in). A closer distance will give a larger texture.
The time to spray a diluted coating is 60 minutes. If more than 5 hours have passed after applying the layer, the surface should be sanded a little before applying the next layer.
U-pol recommends applying 2-3 layers of coating. More than three layers are not recommended. Subsequent layers can be applied by observing a 60-minute drying period between layers.
Between bottle changes, the gun needs to be washed for trouble-free spraying. Immediately after use, the gun also needs to be cleaned. The gun can be washed with both solvent and acetone.
Spray with HVLP spray gun
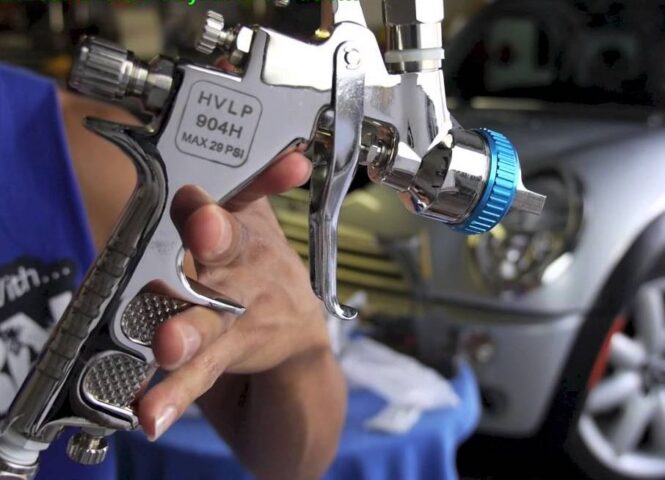
- Application of the Raptor with the spray gun, you can achieve the most smooth surface. Dilute the Raptor with diluent on 10-20% of the total volume.
- Apply a diluted coating with the spray gun with a 1,6-2 mm nozzle.
- The gun should spray at a pressure between 2-4 atm.
- Hold the gun at a distance of 15-17 inches from the surface.
- Apply the Raptor with long movements to achieve the desired texture. Each layer should dry for 1 hour before applying the next layer.
- Raptor can be painted with most modern paints. To do this, you need to wait 24 hours after applying it. Then paint, or varnish is applied.
Raptor coating drying
Coating dries on the “tack” for 1 hour. After 2-3 days, it can be operated with caution. After 7 days, the surface painted by Raptor is completely ready for use. Drying can be accelerated by increasing the temperature (60 degrees Celsius), but full solidification will also occur no earlier than 7 days. It is not recommended to dry the Raptor with infrared drying.