It doesn’t matter if you’ve just started your vaping journey or you’re a vaping veteran, everybody needs to clean their vape tank. A grimy tank doesn’t do your e-liquids any favours and stops you from making the most out of your vape. Getting into the habit of consistent and thorough cleaning can really transform the taste of your e-liquids, changing your vaping experience for the better. Don’t know where to begin? Here’s a step-by-step guide to cleaning your vape tank:
1, First things first – preparation. Make sure you have some warm water ready alongside a non-fibrous cloth. Getting everything set up correctly should always be your top priority.
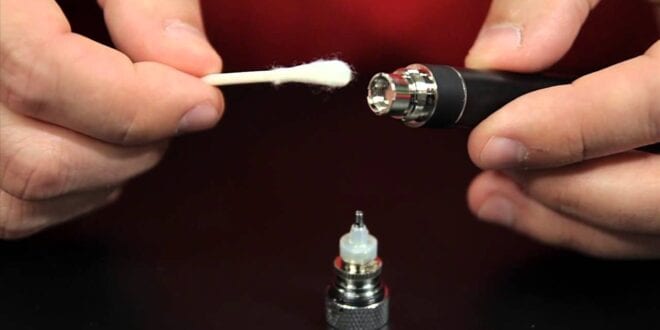
2, No matter how much experience you have, let’s not forget safety! Unscrew your tank from the coil and battery with lots of care. Always bear in mind – the more you disassemble your device, the more thoroughly you can clean it.
3, Here’s the fun part! Now’s the time to get rid of any sticky leftover e-liquid in your tank. Hover your tank under a tap of warm water and then carefully place it in your bowl of water for a few minutes. Make sure your water’s not too hot – you could damage your device if you’re not careful.
4. Take out your tank from the bowl and double-check that all that vape juice has been washed away. Occasionally you’ll have a few bits leftover that need some extra elbow grease. Grab a cloth soaked in alcohol to help you rub those annoying leftover parts.
5. With a dry cloth, it’s always best to give your device an extra dry by pushing it in and out and twisting your way around the empty tank. Leave your vape tank for about fifteen minutes longer and it should be dry and ready to go.
6. Ready to start vaping again? Let’s get reassembled. Double-check all your components are dry and carefully slot and twist everything firmly back in place.
7. It’s the time you’ve been waiting for! With everything fresh and clean, it’s time to sit back and enjoy your favourite e-liquid flavours.
It’s important to realize just how much of a difference vaping with a clean tank can make to your e-liquids. If you’re a flavour chaser, you definitely should be making this your number one priority. One of the main reasons people move to vaping is the sumptuous flavours on offer and if you’re diminishing those subtle undertones you’ll never understand what all the fuss is about. When you’ve given your tank a good clean, we’d recommend T-Juice’s Red Astaire e-liquid – a brilliant blend of red berries and menthol that any vaping fanatic will adore.

Another great way to keep cleaning your device at the forefront of your mind is to make it part of your daily routine. Just like brushing your teeth or sitting down for your 7pm meal, we’d suggest taking some time out of every day to double-check your vaporiser. Those days you can spot a bit of clogging or notice your flavours tasting a bit less vibrant than before, give your tank a thorough clean so you can stay on top of the vaping game. Keeping it in your mind to check on your device is a great way to keep that consistency going.
Cleaning your vaping device also stops some of the vaping pet peeves that many cloud chasers bump into now and again. One of these is the dreaded burning taste that can occasionally occur. If your tank hasn’t been properly cleaned, the coils can react in a way that results in a horrible burning taste on your tongue. If you’re a fan of burnt toast in the morning, you’ll be alright – but for the rest of us it’s best to avoid. Cleaning your tank consistently is one of the main ways to fight that taste.
If your device seems to be clogging up more often than not, maybe it’s time to invest in a better quality product. There’s loads of options for vapers of all kinds out there and it might be time for you to upgrade anyways. Have a browse around the internet for some quality products and engage with the welcoming vaping community online to get some help. There’s loads of vapers on social media and in forums who really know their stuff, so there’s no harm in asking questions you’re struggling to find answers for.

It should also be emphasised that a quick wash down will always come back to bite you at some point. Make sure you’re not skipping on giving the tank a thorough clean – it’s really easy to miss some of that hidden away, sticky vape juice residue. Once you get into the habit of cleaning with high standards, it will keep your consistency high. If you’re still having trouble, there are even cleaning sets available that will give you a great place to start. At the end of the day – the more cleaning you do, the more likely it is that you slip into complacency.
We’d also like to note that your cleaning process should be as safe as possible. Make sure everything is disassembled in the correct way with your battery away from any liquid. It’s also very easy to forget how to reassemble your vaporiser the first time you do a clean. Keep an eye on how and where certain components fit back into your vaping device so that you don’t have any trouble a little later down the road. When you are reassembling, always ensure that everything is screwed back in with a reasonable amount of pressure – we don’t want to break anything and stop your vaping flow.
Keeping up a habitual cleaning routine is really important if you want to get the most out of all those juicy e-liquid flavours. Get rid of that clog and residue and you’ll discover a new side to vaping that you didn’t even realise you were missing. After a few cleans, you’ll get the hang of it in no time. Follow our guide to leave all those grimy tank days behind you!