
A concrete driveway is an excellent upgrade to any property with its clean appearance and superior durability. If you’re planning to tackle the task of building one, there are several considerations to bear in mind to ensure the best possible outcome. When you have a concrete driveway, it provides a safe place for children to ride scooters or bikes, minimizes soil erosion, and keeps your car clean.
Considerations In Building A Driveway

If you decide to build one, it requires effort and money. However, if you’re eager to work on this large-scale project, it can be a rewarding job as long as you’re familiar with the basics. Whether you’re going to create one on your own or you’d like to learn how professionals in Colorado Springs handle this job, checking concretecontractorcoloradosprings.com and others would be helpful.
If you’re ready to work, here are several tips to make the building process manageable:
1. Check The Local Ordinances If A Permit Is Necessary
Depending on where you’re living, you might need to secure a permit first before you can start building. In some states, the height, level, and width are determining factors if a permit is necessary. If there’s a homeowner’s association in your neighborhood, you should check out the rules on how and where you can install your driveway.
2. Execute Proper Planning
As a large project for your home, it’s crucial to plan out your project carefully, especially since it involves pouring concrete. Double-check whether the essentials are in the proper order before starting as it can be laborious and costly to make a mistake halfway.
Before creating any blueprints or scheduling the delivery of materials, secure a permit or permission if needed. Once you have a permit to proceed with your project, you have to evaluate the lay of the land where you’ll build. At this point, you have to consider drainage problems and possible damage to your car that’s often due to a driveway with a steep incline.
It’d be best to consider how your parking will connect with the road. Check if you can back your vehicle out onto the road safely. If your house is in a blind corner, the best move is to design a driveway that allows you to turn around before leaving.
3. Decide On The Size, Route, And Shape
You can picture out and draw the basic outline of your project. Ensure you’ll consider the overall width and length along with the location where you’ll park your vehicle and whether or not you need space to turn around. You need to have at least 18-20 feet for a car and 22-24 feet for trucks or vans in most instances.
As for the width, one vehicle requires 10-12 feet. For every foot you add to the length or width, it causes an increase in your expenses. The drawing will serve as a basis for the number of materials you need to buy.
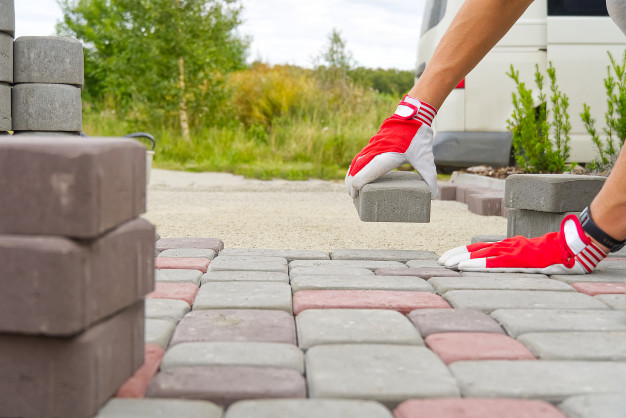
4. Choose The Suitable Forms And Reinforcement Materials
Generally, you need to acquire wood that’ll serve as the forms and stakes for reinforcement. A good example is a pine board measuring 1 inch by 4 inches, which is a suitable choice for laying a driveway with 4-inch stakes. Ensure the pine board is long enough to cover the entire driveway as you start pouring the concrete.
5. Find A Supplier
As a permanent structure in your home, it’s crucial to use the best materials available. When choosing a concrete supplier, make sure you’ll find a reputable one. Although there are several suppliers available, not all of them have the same standards. As a rule of thumb, don’t settle for the first supplier you see.
It’s best to do your research by checking online reviews, looking around for quotes, and meticulously assessing potential suppliers for their insurance coverage. After you shortlist your choices, you can decide on which supplier to work with.
6. Prepare The Site

Once you finish the preparatory processes, it’s time to start by laying the foundations for the concrete. Start by setting up the forms. These are the wooden boards that function as the borders when you pour. Position these around the site and secure them in place by utilizing wooden stakes and string.
7. Pour The Concrete
When the foundation is in place, proceed to pour the concrete to fill up the entire site. Once the area is completely covered, allow the concrete to cure. Always remember that the curing process is essential as it’ll enable the driveway to work as it should for a long time.
If you’re not familiar with how the curing process works, it requires time. The process involves maintaining the right level of moisture within a temperature range to ensure hydration during the early phases. Remember, hydration is the chemical reaction amidst cement and water that leads to the production of chemicals contributing to the setting and solidifying of the concrete.
Concrete reaches partial curing after 48 hours, but it can take a week to achieve 70% strength and approximately four weeks to attain full strength. One way to speed up the curing process is to cover the concrete with a plastic sheet. It helps regulate moisture levels by preventing it from escaping while also averting excess moisture from entering and disrupting the balance. Additionally, you can also utilize heaters to hasten the curing process, but be careful not to overheat the concrete since it can cause drying out rapidly.
Conclusion

Once the curing process is a success, it’s time to park your vehicle in your new concrete driveway. After parking your car for the first time, check out for indications of cracking or crumbling. When the driveway is in good form, you can remove the wooden framing for the pouring process.
Building a new concrete driveway for your home is a manageable task with the help of these tips. With proper planning and material preparations, you’ll have a new driveway you can be proud of. Consider the ideas mentioned here as you prepare for the task.